Thursday, August 13, 2015

How to make Chocolate Letters and other Decorations

A few months ago it was my mother-in-law's birthday and being the cake decorator in the family,
I only had time to make cupcakes. I wanted to do something
 special with them and decided to create chocolate letters.
Have you ever wanted to decorate with chocolate decorations?
It is really easy to do and I am going to show you how.
 
The first thing you need to do is make your cake or cupcakes.
 I made mini-cupcakes this time.
Measure the width of your cupcakes.
My mini-cupcakes turned out to be 1 1/2" wide.
Now it's time to get on your computer and pick the font or decoration that you want to use.
You can use any font that you want!
Keep in mind that the more difficult the font, the harder it is to trace it. You need to have a very steady hand to trace them and the chocolate is very runny.
But, pick the font that matches your theme or that you like.
 For this project I used a font called Lumos, it was created to resemble the Harry Potter font.
You can download it here or here for free.
Open up Microsoft Word, change your page orientation to landscape,
and type out the message you want to create.
You want to make sure that you pick the right sized font that will be big enough for your project.
If you are decorating a cake, make sure that the project will fit on your cake.
For this project I used a 115 font size.
Make sure that you bold your font as well.
Print it off and tape it to a cookie sheet.
Cover it with parchment paper (NOT wax paper) and tape that down as well.
If you don't have any parchment paper, you can use wax paper, but it is more difficult to get the chocolate off of the wax paper. The chocolate wont stick to parchment paper and it makes it easier to take the chocolate letters off.
 It's time to grab your chocolate and melt it down properly.
You can purchase the Wilton Candy Melts at any crafting store and even WalMart. You can also buy it in any color! If you can't find the color you want, buy white and add Wilton gel color once it is melted.
Follow the instructions on the back of the bag to melt the chocolate.
Be very careful to follow the instructions.
If you try to melt it on full power in the microwave, the chocolate will burn and it will be ruined.
So be cautious.

You can see that the chocolate is nice and smooth.

I like to take my piping bag (with tip already attached) and drape it over a glass.
That way it is easier to fill.

 Pour all of your chocolate into your piping bag.

Now you need to trace your letters or picture.
Excuse the chocolate blobs all over the cookie sheet.
I melted too much chocolate and didn't want to waste it, so I made blobs that I could melt another time.
 
While the chocolate is still soft, you can take a toothpick and carefully smooth out your decoration, or give it some texture.

Put your cookie sheet into your fridge for 15-30 minutes.
You can leave it out on the counter, but it will take longer to solidify.
I like to put it in the fridge so the chocolate will get nice and hard.
If you used parchment paper, the letters will slide around.
If you used wax paper, carefully pull up the wax paper and you can peel it off the back of the chocolate. I used to use wax paper and I had multiple letters break trying to get them off.
If your house is really warm, don't put the chocolate decorations on until right before you serve it.
You will want to make sure that your hands aren't too warm when you're handling the chocolate, or it will melt or even break your letters or decorations.

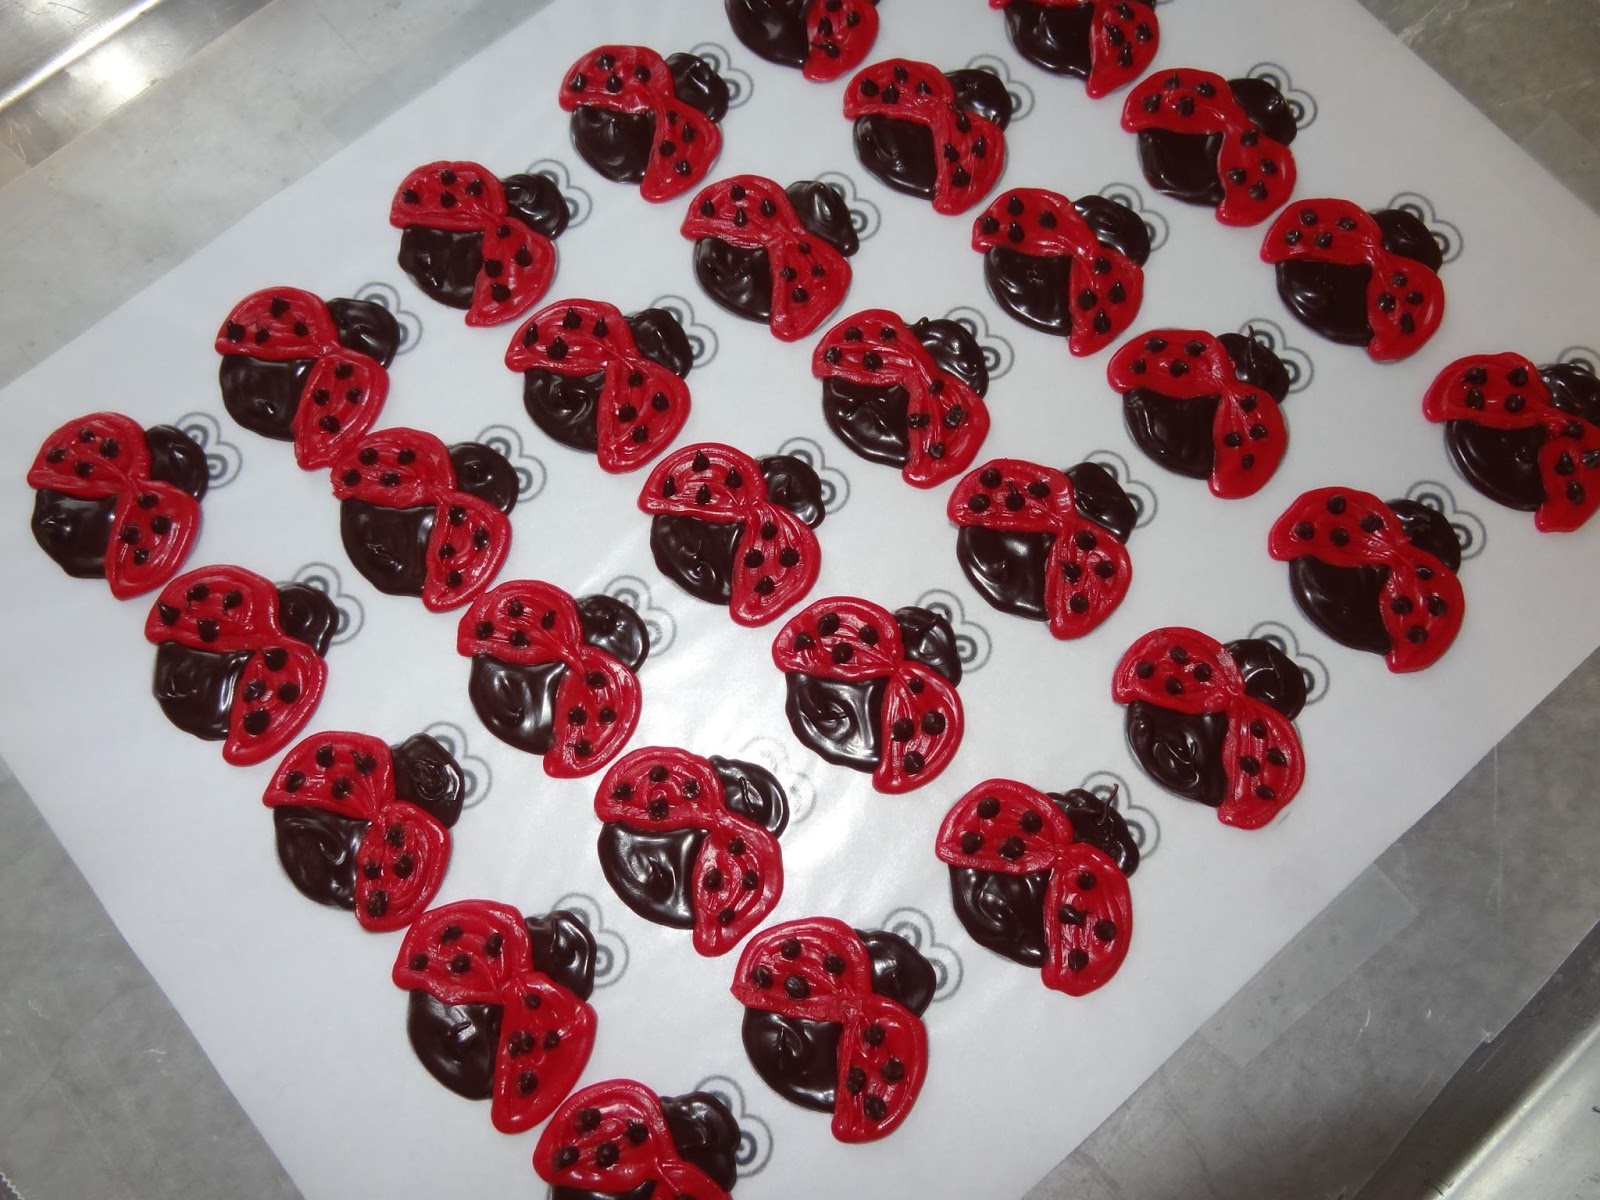
For my daughters first birthday, I make chocolate ladybugs to go on top of her cupcakes.
I used the same process as the letters, but I did two different colors.
I did the chocolate first, let it cool and then I did the red wings.
Working with chocolate is messy, difficult at times, but it looks great when all is said and done.

Let me know if you have any questions!

Monday, July 6, 2015

Single Serving Eggless Cookie Dough Recipe

I have a confession, I am addicted to cookie dough, specifically chocolate chip cookie dough. Not so much the chocolate chip part, but the dough...hmm. If I am left in a room that contains cookie dough, I will eat all of it without thinking twice. Phew, I feel better now that I got that off of my chest! I know that it is not healthy, but it is my vice.

Years ago, I created this delicious chocolate chip cookie dough recipe. Most of my family and friends have raved about it. All of the cookies and dough would be gone within a couple of days. It is that good!

The other day I had a craving for cookie dough. Normally I make a full batch of cookie dough and freeze most of it into cookie dough balls. I didn’t want to have a full batch of dough taunting me all day long, I decided to make a single serving of cookie dough based on my recipe.
It turned out delicious and it was the perfect amount that I don’t feel sick.
Note: This dough can be used for a variety of cookies!
Chocolate Chip, Chocolate Chocolate Chip, Peanut butter, Oatmeal Raisin, etc.
I’ll have instructions for these at the bottom of the post.

Here is what you will need:
Main Ingredients
1 TBSP White Sugar
1 TBSP Brown Sugar, firmly packed
1 TBSP butter, at room temperature (it needs to be soft!)
½ TBSP milk
1/16 tsp (smidgen) salt
1/10 tsp vanilla
1/3 cup flour
Whatever additive you want with your dough
Chocolate chips, M&M’s, Macadamia Nuts, Walnuts, Reese’s Pieces, etc.
The sky’s the limit!

Here are the instructions:

1. Add sugars and butter into a small bowl.

Mix together until a paste is formed.

2. Add milk, salt, and vanilla and mix again until thoroughly combined. The mixture will look runny.

I had to show you a picture of some measuring spoons I received when I got married. They are so cute! That is why I put a "smidgen" in the recipe.
By definition, a smidgen is a small amount of something.
Mathematically, you need 1/16 tsp of salt for this recipe.


3. Add the flour and mix until a firm dough is formed.

4. Now is the time to add your additive and mix.
I prefer chocolate chips.
450 calories of pure bliss!
I mean, no calories and so delicious.
Hehe.

Other variations:

Chocolate Chocolate Chip
- When you have reached step 3 (adding the flour) add 2 TBSP of cocoa powder and 4 TBSP of flour. Mix until a thick dough is formed and then add chocolate chips, peanut butter chips, or even white chocolate chips? Or macadamia nuts and chocolate chips?

Peanut butter
- After step 1, add 1 TBSP of peanut butter and mix until the peanut butter is thoroughly incorporated. Continue with the remainder of the recipe as outlined. You may need to add 1-3 tsp more of flour, depending on the thickness of the dough. You could even add 3 TBSP of chopped of peanuts to the dough for a little crunch.

Oatmeal raisin
- 30 minutes before you start, take 3 TBSP of raisins and put them in a glass cup or dish with boiling water. They will plump up almost twice their size after 30 minutes. Strain them and set aside until needed.
- At step 3 (adding the flour) add 2-3 TBSP of oatmeal and 1/4 cup (or less) of flour. Stir until a nice thick dough is formed. Gently mix in the raisins and you're good to go.

Let me know if you have a favorite cookie that you like to make or if you found a different dough variation that you would like me to include!

Happy eating!

Wednesday, April 8, 2015

Inexpensive Deer Repellant...that really works!

I live on the edge of the wilderness in Montana.
We have a plethora of wildlife that pass through our yard all year long.
Bears, mountain lions, skunks, squirrels...
and most annoyingly...
DEER!!

They eat EVERYTHING they can find!
The first Spring in my house, 6 years ago, my husband and I planted tulips.
We put them in the front of our house, as well as the side.
That first year, they grew so tall and were beautiful!
We were so excited to have tulips every year.

The next year, our tulips started coming up and a few weeks later...
the deer had come and eaten everything that was sprouting.
Nothing else grew that year.
We decided to put up an electric fence the third year.
It turned out that our grounding rod didn't work properly, so again, those dang deer ate everything!

We became so discouraged!
Year after year our beautiful tulips were being a consumed by deer.
We couldn't put up a 7' fence around our house to protect them,
our electric fence wasn't working, and we were out of options!
We talked about digging them up and planting a different flower that deer don't like to eat.

I have recently started a new job.
In my conversation with one customer, we started talking about flowers
and how the deer around here eat everything.
This wonderful woman, told me that for 30+ years she was able to keep the deer away from her flowers with one simple trick...
Irish Spring Original Soap!
WHAT?!?!
She would put whole bars around her flowers and garden and the deer wouldn't touch it!
She emphasized the Original Soap, not the other varieties.

I decided to purchase some that day and try it out.
I took one bar, cut it into chunks, and placed them between flowers.
 Our tulips haven't been touched yet!
 I am so excited to finally have tulips growing!
Once a week, I flip the soap over so that a fresh smelling side is up.

Now the only problem I have, a neighbor animal (I think a dog) has found our soap and has been taking it. Hopefully that animal isn't getting too sick from eating it.

I will keep you updated on how long this trick works.
But so far, it is working fantastically!

Wednesday, March 18, 2015

Homemade Brown Sugar, The Right Way!

Learn from my mistakes!
Read this post to learn how to make Brown Sugar from Scratch the right way.


I needed to make some cookies for a church activity tonight.
I went into my pantry and found this...
My brown sugar container was empty!!
I didn't have time to run to the store and going only for brown sugar was not worth it.
I decided that I would make my own.
I remember reading a recipe for brown sugar on my molasses container.
I always thought that it would be fun to try.
So I pulled the jar out and read it:
"Mix 1 cup granulated sugar with 1/2 cup molasses."
Do NOT use this recipe, read on to find out why.
Hmm, that is simple enough.
I decided that I wanted to make a good sized batch.
I poured 4 cups of sugar into my container.
As per the recipe, I proceeded to pour 2 cups of molasses on the sugar.
That looks like A LOT of molasses!
I assumed that it would blend nicely and I would have perfect brown sugar.
I pulled out my hand mixer and started mixing away.
 I kept mixing and mixing, making sure that I had all of the granulated sugar mixed with the molasses.
When I was sure that it was mixed thoroughly, I was extremely disappointed!
 This didn't look ANYTHING like brown sugar!
It was a sludge consistency and was dripping off my beaters.
This can't be right?
Did I do the math correctly?
I pulled out my calculator to double check and sure enough, I had done the math right.
I jumped on the computer to see if anyone had a different recipe.
I found three websites/blogs that had a recipe.
They called for 1 - 2 TBSP of molasses to 1 cup of granulated sugar.
To put into perspective the amount that I used when following the Grandma's Molasses recipe:
I put in 8 TBSP of molasses to 1 cup of granulated sugar.
 There was no way that I was going to use this in a recipe.
I couldn't afford to throw out what I used.
I transferred my sludge into a bigger container and started adding more granulated sugar.
I ended up with 10 cups of granulated sugar and 2 cups of molasses.
As you can tell by my picture, my homemade brown sugar is darker than my store bought brown sugar.
The measuring cup has residual store bought brown sugar.
 I got to a point where I could no longer add any more sugar since I was running out of room in my bowls and my poor hand beater was starting to feel warm and I didn't want to burn out the motor.
 I could have added an additional 6 cups of sugar to make the brown sugar properly.
I didn't have storage, so I ended up leaving it as is.
My final ratio was 3.2 TBSP molasses to 1 cup sugar.
I made a batch of my chocolate chip cookies with it and to my surprise, it tastes the same!
There is a hint of molasses when you taste the cookies.
Thankfully, it isn't so much that you don't like it.

The moral of this story?
Make brown sugar from scratch, but use the correct recipe.

Homemade Brown Sugar
1-2 TBSP molasses (depending on how strong you want the flavor to be)
1 cup of granulated sugar
Mix with beaters or a fork until combined well
Store in an airtight container
If it gets too hard, put a slice of bread in the container

I hope that you learn from my mistake and spread the word to
NOT use the recipe on the Grandma's Molasses bottle!

Monday, February 9, 2015

The Best Sugar Cookie & Frosting Recipe

At least once a year, or more, I make sugar cookies.
I LOVE sugar cookies, my husband isn't as big a fan.
I love soft and chewy sugar cookies with frosting that tastes like ice cream!
An added benefit is that you can decorate them in any color
and you can go crazy on the time spent "coloring" the cookie with frosting.
These are very low quality photo's, but your options are endless!
I had my nieces and nephew over to decorate cookies.
I had every color of the rainbow of frosting and let them have at it.
They were very creative!
One year at Christmas, I had a friend over for cookie decorating.
So many options with sugar cookies!
With all that being said, I have the perfect Sugar Cookie recipe
and a butter cream frosting to go along with it.


BYU Sugar Cookies
(I got this recipe from my Uncle who used to work at BYU)
-1 cup Sugar
-1/2 cup Butter (1 cube) softened, but not melted
-1 egg
-1 tsp. Vanilla or Lemon Extract
  (I use Vanilla, you could even use Almond extract if you wanted)
-2 tsp. Baking Powder
-1 tsp. Baking Soda
-1/2 tsp. Salt
-3 1/2 cups Flour
-1/2 cup Milk
-Bowl of sugar

1. Preheat oven to 350 degrees.
2. Beat Sugar, Butter, and Egg together until well mixed.
3. Add Vanilla, Baking Powder, Baking Soda, and Salt and mix again.
4. Add Flour alternately with Milk (I fill a 1/2 cup measuring cup with milk, then turn the mixer on and add 1/2 cup of flour, then approx. 1 TBSP of milk, then 1/2 cup of flour, 1 TBSP milk, etc until I have used up all the flour and all the milk).
5. Take half of dough and roll out on a floured surface about 1/4" thick (I like my cookies to be thick. You can roll the dough out thinner if you want to get more cookies out of the recipe.  This will also make them a little bit more crunchy. They will still taste yummy!)
6. Fill a bowl with sugar, about 1/4 to 1/2 cup.  I dip the cookie cutter into the sugar, then I use it on the dough. This is optional and isn't necessary.
7. Place cookies on a greased cookie sheet (or a silicone covered cookie sheet if you have one, they are the BEST!)
8. Bake in oven 8-10 min.  The cookies will not be brown around the edges and the underside will be light brown.  The cookies are done at this time, but if you like them a little bit crunchier, add 1-3 min, depending on your tastes. I like my cookies thick and soft.
9. Immediately after they come out of the oven, I take pinches of sugar from the sugar bowl and sprinkle the cookies with it.
10. Let cookies cool completely before frosting, or the frosting will melt.


Holli's Buttercream Frosting 
(This frosting is great for cookies or cinnamon rolls)
-1/2 cube of butter, softened but not melted
-1 tsp. Vanilla extract
-3-4 cups Powdered Sugar (amount is approximate, depending on how much frosting you want)
-2-3 TBSP Milk, plus additional milk to reach desired consistency

1. Place butter in mixing bowl, add Vanilla, milk, and 2 cups Powdered Sugar.
2. Mix together, I use a hand mixer for this recipe (Most likely the texture will be small pea sized balls of butter coated with powdered sugar).
3. If frosting is the consistency and amount that you want, then you're done.
     If it is not the proper amount, then add 1 cup of Powdered Sugar and mix again.
4. Add 1 TBSP of Milk if frosting is too thick.  If frosting still appears too thick, fill 1 TBSP measuring spoon with Milk and add a few drops at a time until frosting reaches desired consistency.  1 TBSP could be too much and make it too thin, then you would have to add more Powdered Sugar. (NEVER exceed adding more than 1 TBSP of Milk at a time.)
5. At this point, you can either separate frosting into bowls of equal portions and add food coloring, or you can add food coloring to entire batch, if you only want one color.  I like to have all colors of the rainbow when decorating cookies.
    *If you are using liquid food coloring, that can cause your frosting to be runny. After you have added the liquid coloring, mix again and see if you need to add more powdered sugar to thicken up.
     *If you are using gel food coloring, then you don't have to worry about it.
6. Once frosting is colored, add small portion (or all of one color) to one corner of a sandwich bag.  Push all the frosting down to one corner and twist bag tight around frosting.  Cut a small corner off and you have a frosting bag so kids can decorate cookies however they want.
7. Frosting will keep in sealed container in fridge for 2-3 weeks.  If you do put it in the fridge, let it sit on the counter for 1 hour to soften up, mix, and you're ready to use it again.

So easy and very delicious!

Friday, January 23, 2015

Daniel Tiger Goody Bag

My daughter turned three a few months ago.
Her favorite tv show is Daniel Tiger's Neighborhood.
I decided to decorate with all Daniel Tiger characters.
First, I found these rounds here at the pbs kids website.
I didn't want to make the pinwheel since it takes up so much paper!
So I printed off the characters and put a coordinating color on the back.
Then I hung streamers below the rounds.

Second, I wanted an information sheet for my daughter.
I found one online for $20+ and decided to save money and make it myself.
 Third, our refreshments were very simple!
I found a $1 plastic polkdot table cloth at Walmart.
We bought Fruit & Veggie juice, a veggie tray, and mini quiches at Costco.
 Then a bag of chips and wrapped lil smokies in biscuit dough.
I made cupcakes and frosted them with orange frosting,
and put chocolate strips on top of them.
Now that I see what we had, we had a lot of food!
But, it was simple and delicious!
Lastly, I wanted a cute goody bag for the kids to take home.
I looked everywhere and didn't find anything that I liked.
So I decided to make one myself.
When I showed it to my daughter she said, "I love it!!"
I got her stamp of approval.
Here is the image of what it looks like before you fold it.
You can download the file here.
MAKE SURE THAT YOU PRINT OFF ON 11X17 CARDSTOCK!
That is the size that I made the file for.
If you would prefer to have a blank goody bag,
you can download the .png file right here.

Just click the image, right click, save as..., and save to your computer.
Again, make sure you print it off on 11x17 cardstock.
I had a very difficult time finding good quality .png files of the characters.
So I am uploading the files I created in the hopes that someone will be
able to use them in the future.


Thursday, March 13, 2014

"You Are Loved" Valentine, Free Printable

I made some Valentine's for a few girlfriends this year.
I created this Valentine and attached a large sugar cookie
decorated in pink buttercream frosting and heart sprinkles.

If you want to print it, click the picture,
right click, click save as..., and save to your computer.